
Welcome to UENI Mail
Now more than ever, professional email is essential for small businesses. It will help you build credibility with your customers, help people remember your brand, and make sure that people are contacting you through the correct channels.
When you sign up for a Plus or Reputation plan with UENI, not only do you get a custom domain for your business, but you can also create up to four custom email accounts that are linked to that domain.
In other words, you can create separate email accounts for customer service, enquiries, sales, bookings, press contacts, or whatever strikes your fancy. All directly linked to your domain, so not only can you appear more professional, but you can also keep your business communication sorted.
What’s more, all of your email accounts are accessible from your UENI Hub, allowing you to easily keep tabs on your emails and stay up to date with all of your business communications.
We call it UENI Mail, and this guide will help you set up this feature and integrate it with your business as seamlessly as possible.
How to Choose a Professional Email Address
To set up your professional email address with UENI, you’ll need to upgrade to a paid subscription and then select your custom domain name.
Once your domain name is live, setting up your professional email address is easy!
Log into your Hub and head to the Pro Features Section, fill out the information like so:
And hit submit. Once your request has been submitted, your email address will be ready in a few minutes!
When it comes to choosing the email you want, the most important thing is to keep in mind the communication channels you’ll want to show to your customers.
Do you need a customer support email? Will you need a Sales account? Will you need an “info” or “information” account for general enquiries? All of this should be taken into account when creating your professional emails.
For help with setting up your professional email accounts, please see our Help Article.
Setting up UENI Mail on Your Phone
Being able to send and receive professional emails from your smartphone is key to staying on top of all of your business communications.
Below, we’ve compiled the steps for successfully setting up UENI Mail on the three most common phone types in use today: Android phones, Apple iPhones, and Huawei phones.
How to Set Up UENI Mail on Android
These instructions will help you set up your UENI Mail account on Android phones.

- You start by opening the Gmail app.
- Click on “Settings” and then head to “Add account“
- Select ‘Other’
- Add your email address and the server will retrieve your information.
There are a few more steps where you’ll have to configure your account details and the email servers. For a step-by-step guide complete with pictures, please visit our Help Center Article.
That’s it, you should be all set up for Android!
How to Set Up UENI Mail on iPhone
These instructions will help you set up your UENI Mail account on Apple iOS products, including iPhones and iPads.

- Go to your device Settings > Accounts & Passwords, then tap Add Account
- On the provider list, select Other
- Then tap Add Mail Account
- Next, type in your name, email and password as shown below.
Then you’ll have to input your server details, which you can in our Help Center article, alongside step by step instructions.
You should be all good to go with these steps, and ready to use UENI mail on your iPhone.
How to Set Up UENI Mail on Huawei
Last but not least, these instructions will help you set up UENI Mail on Huawei devices.

- First, click on Settings
- Go to Users & account
- Click Add account
- Click on Email
- Now, enter your email and password
- Select IMAP
Once you have done that, you’ll be brought to an incoming server settings page, where you will need to update the server information with the UENI Mail server information.
Then you’ll arrive at an Outgoing server settings page, which will also require you to input additional server details.
Those details can be found in our Help Center guide.
How To Manage Your Contacts

One of the reasons people are hesitant to switch to a professional email system is that they’re not excited about the prospect of moving their contacts over.
We get it, it makes sense. Usually businesses build up slowly, one or two customers at a time. You’re happily plugging away using your personal email, and all of a sudden you realise that you’re getting work emails constantly.
Luckily, adding your contacts to UENI Mail couldn’t be simpler.
How to Add Contacts Individually
To add individual contacts to your UENI Mail account, just follow these steps:
- Log in to your UENI mail account
- Click the Contacts icon at the top-right corner (between Inbox and settings)
- Click on New contact in the top-left corner
- Enter the details of the new contact, e.g. name, organisation, email addresses, etc.
- Press Save
For a visual walk-through, please check out our Help Center guide here.
How To Import Your Contacts
Adding your contacts one by one is great if you don’t have that many, but if you’ve got quite a few contacts to go through it can get pretty cumbersome.
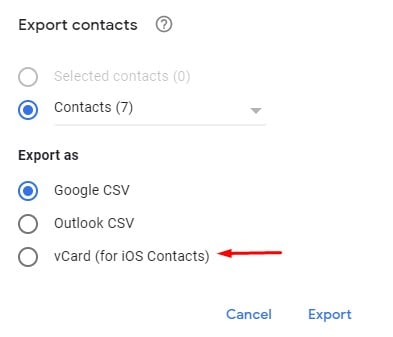
Luckily you can do it all at once, you’ll need to export a vCard file from the email provider you currently use.
This is pretty easy: to export your Gmail contacts, for example, you just need to open contacts.google.com and click “Export”, then select vCard as your option, like this:
Once you have the vCard file ready, follow these steps on UENI Mail:
- Go to Contacts
- Right-click on the name of the Address book where you want to import the contacts
- Click Import Contacts
- Click Upload and find your Card file.
- Then Click Import
You can see a gif below

Voila! Your contacts should be imported to the UENI Mail address book you selected.
How To Add An Address Book
In UENI Mail, Address books are ways you can sort your customers into different groups: a handy feature if you offer different plans or subscription levels for your business.
To add an Address book in UENI Mail, please follow these steps:
- Log in to your account with UENImail
- Click the Contacts icon at the top-right corner (between inbox and settings)
- Click on + Address Book on the left side of the screen
- Enter the name of this new address book e.g., Family
- Press Save
- Click on the new address book on the left-hand side to view this new group
For a visual example, please check out our Help Center guide.
How to Add and Edit Your Signature

Your email signature is a line of text that is added to the end of every email you send. Most often for a business email you’ll want to include your position, your contact information (phone number, any relevant social media profiles, and so on).
To add and edit your signature in UENI Mail, Click on the Settings icon on your email toolbar. You’ll find it on the right-hand side of your screen.
Next, click on Signature, you’ll be able to type your desired signature in the text field provided.
For a visual guide, please check out Our Help Center Article.
Email Forwarding with UENI Email

Forwarding Emails to UENI Mail
When your business is growing enough that you need a professional email address, one of the most important things is making sure all of your legacy emails are going to make it over.
We get it: your customers already your existing email address, and you don’t want to check two places to make sure you’re not missing out on orders or bookings. The good news is that there’s an easy solution.
Whether you’re using Gmail, Hotmail, Yahoo Mail, or another provider, it’s pretty easy to set up email forwarding to your UENI Mail account.
To set up email forwarding from your old email address, follow these steps.
Forwarding in Gmail:
We’ve copied these steps from Google’s Support. You can find the full support article here
- On your computer, open Gmail using the account that you want to forward messages from. You can only forward messages for a single Gmail address, not for an email group or alias.
- In the top right, click Settings, then See all settings.
- Click on the Forwarding and POP/IMAP tab.
- In the “Forwarding” section, click Add a forwarding address.
- Enter the email address that you want to forward messages to.
- Click Next > Proceed > OK.
- A verification message will be sent to that address. Click the verification link in that message.
- Go back to the settings page for the Gmail account that you want to forward messages from and refresh your browser.
- Click on the Forwarding and POP/IMAP tab.
- In the ‘Forwarding’ section, select Forward a copy of incoming emails to.
- Choose what you want to happen with the Gmail copy of your emails. We recommend that you Keep Gmail’s copy in the Inbox.
- At the bottom of the page, click Save Changes.
Forwarding in Hotmail/Outlook Mail
We’ve copied these steps from Microsoft’s Support. You can find the full support article here
- At the top of the page, select Settings > View all Outlook settings.
- Select Mail > Forwarding.
- Select Start forwarding, enter the forwarding email address and select Save.
Forwarding in Yahoo:
We’ve copied these steps from Yahoo Support. You can find the full support article here
- Click Settings .
- Click More Settings.
- Click Mailboxes.
- Click the primary mailbox account.
- Under Forwarding, enter the Forwarding Address.
- Click Verify.
- Log in to your forwarding address and follow the instructions sent there.
That’s it, you’ve done it. Send yourself an email to make sure the forwarding works.
Forwarding UENI Mail to Your Personal Email
Let’s face it, sometimes we can’t be “at work” all the time. Sometimes you can’t (or don’t want) to log in to check all of your work messages, but you still want to be able to keep tabs on any important ones that come through.
Good news! You can set up your UENI Mail accounts to forward messages to the email you’re already using so you won’t miss anything.
To set up email forwarding, follow these steps:
- Click on the Settings icon on your email toolbar.
You’ll find it in the top-right corner of your screen - Next, click on Forward Messages
Here you can add up 20 unique email addresses to forward your email to.
That’s it! For a visual guide or if you encounter any problems, please consult our Help Center Article.
How to run a campaign

Email marketing is an essential aspect of using a professional email address to the fullest, because it can boost your brand awareness and customer loyalty.
If that previous paragraph has you in fear, we suggest checking out our guide to How To Run an Email Campaign. It doesn’t have to be that difficult, and you can certainly utilise your UENI Mail account to do it.
Just follow these steps:
- Add a new, blank Address Book with your clientele for a given campaign.
- Work on designing your campaign. Make it perfect.
- Send out your first email campaign and see how it fares.
As simply as possible, that’s it! Once you’ve sent your first email, evaluate the results, see what you could have done better, and think about how you will improve the next one. From there it’s just pratice.